Affiliate Disclosure: As an Amazon Associate, Portable Power Lab earns from qualifying purchases at no extra cost to you.
SAFETY NOTICE: Working inside an electrical panel exposes you to live 120V and 240V conductors that can cause electrocution, serious injury, or death. In most US jurisdictions, connecting any power generation device to a home electrical panel requires a licensed electrician and a building permit. This guide covers technical concepts, product choices, and full scope of work — but physical work inside your main panel must be performed by a qualified electrical contractor unless you hold a valid electrician’s licence. DIY-eligible tasks are clearly identified throughout.
Last Updated: May 2026 | Reading time: ~15 minutes
Why Extension Cords Are Not the Real Answer
This guide is written to give you comprehensive detail on how to wire a transfer switch for a portable power station. Most portable power station owners run extension cords from their station to critical appliances during an outage. The refrigerator gets a cord. The CPAP gets a cord. The router gets a cord. It works — but it is unglamorous, inconvenient, and creates real hazards: trip hazards across doorways, undersized cords carrying loads they were not rated for, and appliances moved from their normal locations in the dark at 2 AM.
A transfer switch changes this relationship from temporary and manual to permanent and integrated. With one properly installed:
- Your refrigerator stays on its existing outlet — no extension cord
- Your CPAP stays plugged into the bedroom wall — no relocation
- Your sump pump stays wired to its dedicated circuit — no workaround
- When an outage occurs, one action (or no action, with automatic systems) connects all protected circuits to your power station simultaneously
But convenience is the secondary reason to install a transfer switch. The primary reasons are safety and legal compliance.
Safety Reason 1 — Back-Feed Prevention
When your power station powers your home, the transfer switch physically disconnects your home from the utility grid at the same time. This is not optional — it is a matter of life and death for utility workers.
Without a transfer switch, connecting a power source to your home wiring while the main breaker is closed creates back-feed — electricity flows backward through the meter onto utility lines. A utility worker performing repairs on what they believe are de-energised lines finds them live from your power station. People have died this way. Every transfer switch type covered in this guide prevents back-feed by making it physically impossible for the utility breaker and the power station breaker to be closed simultaneously.
Safety Reason 2 — Code Compliance and Insurance
The National Electrical Code (NEC) Article 702 governs Optional Standby Systems — which your portable power station qualifies as. NEC requires that power sources be connected to a home’s electrical system through an approved transfer switching mechanism.
An improperly wired connection voids your homeowner’s insurance for fire damage related to the electrical system. If a fire occurs and the investigation reveals a non-compliant connection, your insurer can deny the claim. The permit and transfer switch are the paper trail that keeps your coverage valid.
INFO: Before deciding which transfer switch to install, calculate your critical circuit load first. The wattage you need to support determines which power station and which transfer switch size is correct. See: Complete Appliance Wattage Chart
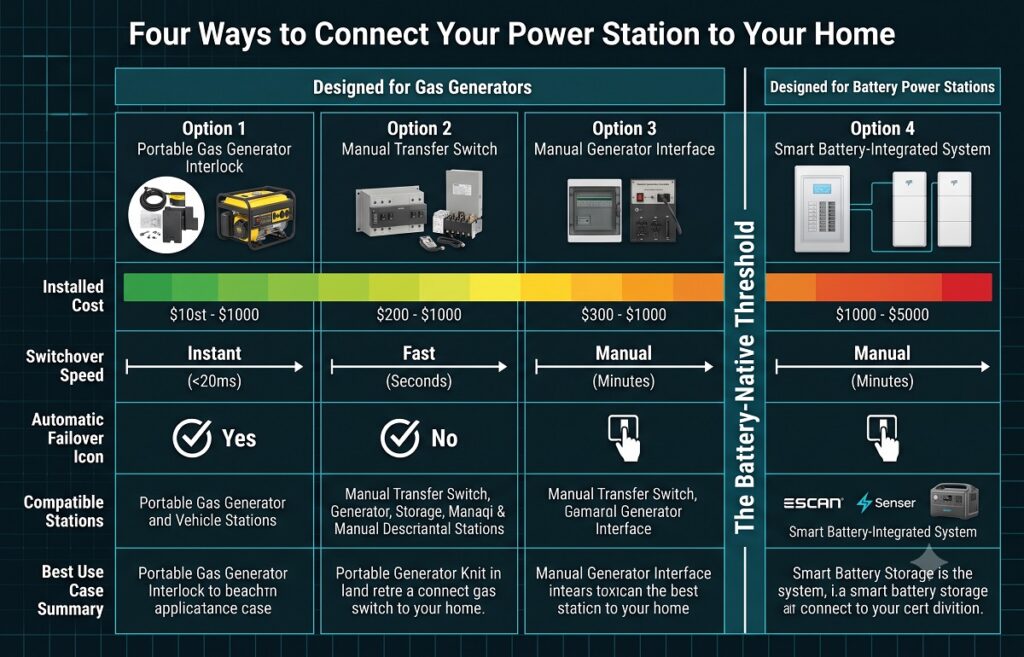
The Four Transfer Switch Options — Complete Comparison
There are four fundamentally different ways to connect a portable power station to your home’s electrical system. Understanding all four before purchasing saves you from buying the wrong system.
Option 1 — Interlock Kit
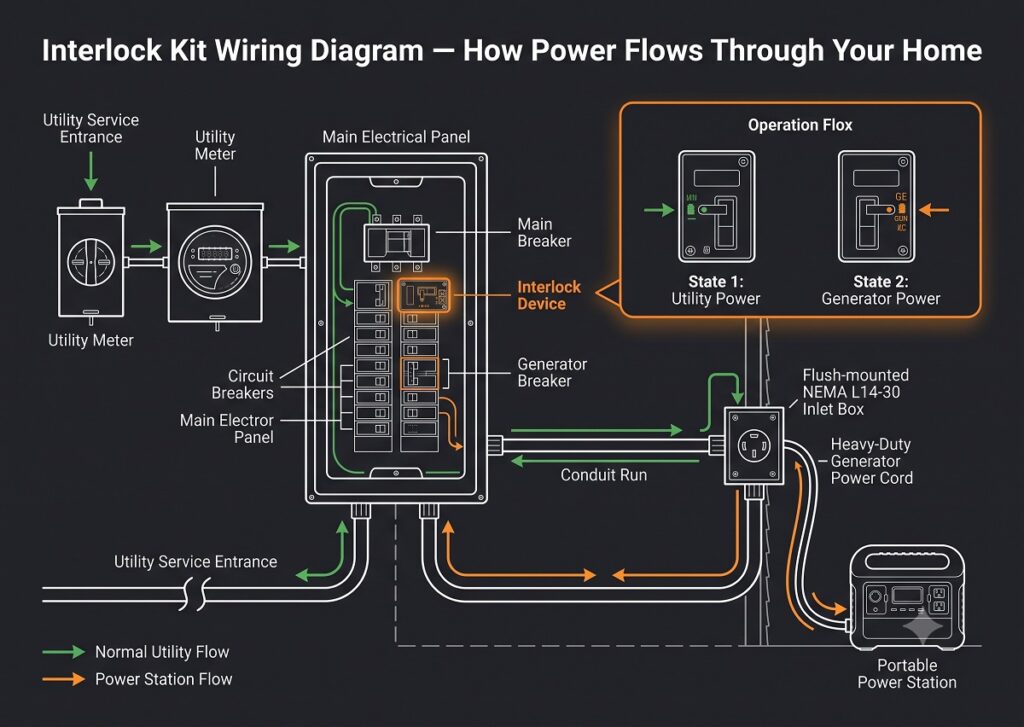
What it is: A mechanical device ($20–$80) that bolts to your existing main panel and creates a physical interlock between your main breaker and a dedicated generator breaker. The interlock prevents both breakers from being on simultaneously — enforcing grid isolation mechanically at the lowest possible cost.
How it works in sequence:
- A licensed electrician installs the interlock and a dedicated double-pole breaker (typically 30A) in your main panel
- A generator inlet box (NEMA L14-30) is mounted on the exterior wall and wired to that breaker
- During an outage: turn off individual circuit breakers, turn off the main breaker, slide the interlock, turn on the generator breaker, connect power station to inlet box, selectively restore circuit breakers
Complete cost breakdown:
| Component | Typical Cost |
|---|---|
| Panel-specific interlock kit | $20–$80 |
| NEMA L14-30 generator inlet box | $30–$60 |
| 30A double-pole breaker | $15–$40 |
| Electrician labour (2–4 hours) | $200–$500 |
| Building permit | $50–$150 |
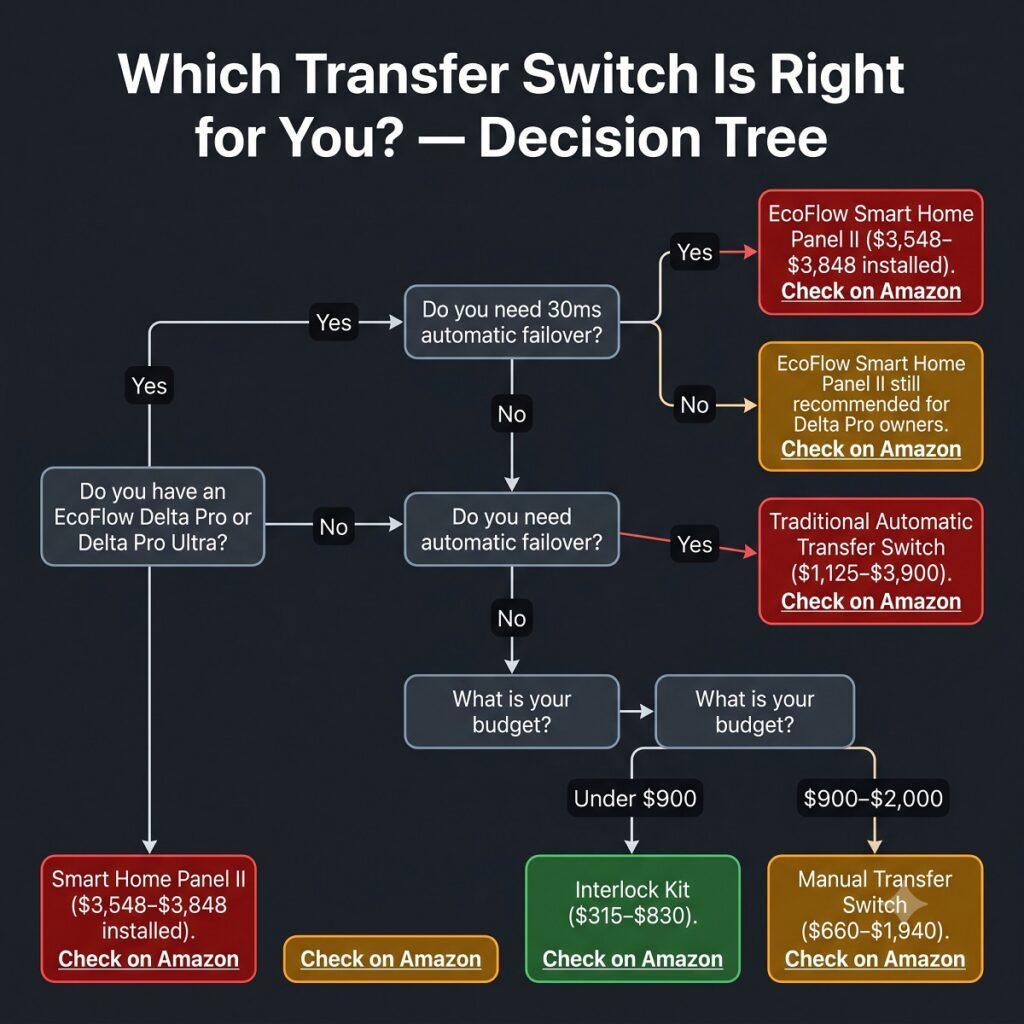
| Total installed | $315–$830 |
Advantages: Lowest cost. Compatible with any power station. No panel replacement required. Panel-specific kits exist for Square D QO, Siemens, Eaton, Murray, and Leviton.
Disadvantages: Manual process requiring you to be present. Must turn off all circuit breakers individually before switching. No automatic failover.
Best for: Homeowners who want code-compliant, low-cost connection for outages they can respond to manually.
🛒 Interlock Kit — Square D QO Panel →
🛒 Interlock Kit — Siemens/Murray Panel →
🛒 Interlock Kit — Eaton/Cutler-Hammer Panel →
🛒 NEMA L14-30 Generator Inlet Box (exterior weatherproof) →
Option 2 — Manual Transfer Switch (MTS)
What it is: A dedicated sub-panel ($150–$600) installed next to your main panel, containing two-position switches for each protected circuit. Each switch has two positions: UTILITY and GENERATOR. Flipping a switch transfers that specific circuit to your power station.
How it works:
- Electrician installs the MTS sub-panel and wires selected circuits (typically 6–10) from the main panel through the MTS
- A generator inlet box is mounted on the exterior and wired to the MTS input
- During an outage: connect power station to inlet box, flip the MTS master switch from UTILITY to GENERATOR, selectively power individual circuit switches
Complete cost breakdown:
| Component | Typical Cost |
|---|---|
| Manual transfer switch (6–10 circuits) | $150–$600 |
| Generator inlet box | $30–$60 |
| Generator power cord (L14-30) | $30–$80 |
| Electrician labour (4–8 hours) | $400–$1,000 |
| Building permit | $50–$200 |
| Total installed | $660–$1,940 |
Advantages: Selective circuit control. Cleaner operation than interlock — one cord connection then switch management. Pre-selected critical circuits simplify outage response.
Disadvantages: Still manual. More expensive than interlock. No automatic failover.
Best for: Homeowners who want pre-selected circuit protection with simple, reliable operation and are comfortable with manual switching.
🛒 Reliance Controls 6-Circuit Manual Transfer Switch →
🛒 Generac 8-Circuit Manual Transfer Switch Kit →
🛒 30A Generator Power Cord L14-30 (25ft) →
Option 3 — Automatic Transfer Switch (ATS)
What it is: A transfer switch that monitors utility voltage continuously and automatically transfers designated circuits to your power source within seconds of detecting an outage — with no human action required. It also transfers back to utility when grid power returns.
How it works: The ATS monitors utility voltage constantly. When voltage drops below threshold for more than a few seconds (configurable: typically 2–10 seconds to prevent nuisance trips on momentary flickers), the ATS opens the utility contactor, signals the power source, closes the generator contactor, and transfers circuits. When utility restores, it reverses automatically after a stabilisation delay.
Switchover time: Traditional ATS units take 2–30 seconds to transfer — long enough for computers to lose work, clocks to reset, and CPAP machines to alarm. This is an important consideration when choosing between Option 3 and Option 4.
Complete cost breakdown:
| Component | Typical Cost |
|---|---|
| Automatic transfer switch (6–12 circuits) | $400–$2,000 |
| Inlet / connection hardware | $50–$150 |
| Electrician labour (6–12 hours) | $600–$1,500 |
| Building permit | $75–$250 |
| Total installed | $1,125–$3,900 |
Advantages: Fully automatic — works while you sleep. Protects medical devices unattended. Returns to grid automatically.
Disadvantages: Most expensive of the traditional options. 2–30 second switchover disrupts sensitive electronics. Overkill for power stations already recharged from grid.
Best for: Households with medical devices requiring unattended failover, where the EcoFlow Smart Home Panel ecosystem is not the chosen platform.
🛒 Reliance Controls 12-Circuit Automatic Transfer Switch →
Option 4 — Purpose-Built Power Station Transfer System (EcoFlow Smart Home Panel II)
What it is: A manufacturer-engineered system designed specifically for battery power station integration. The EcoFlow Smart Home Panel II works exclusively with the EcoFlow Delta Pro and Delta Pro Ultra — and is architecturally different from every other option on this list.
Why it is categorically different:
Traditional transfer switches (Options 1–3) were designed for gas generators. They assume the power source needs 10–30 seconds to stabilise voltage after transfer. A battery power station needs zero seconds — it delivers full-rated power instantaneously. The Smart Home Panel II leverages this to achieve a 20-millisecond switchover — faster than a single AC power cycle, invisible to virtually every connected device.
What 30ms means in practice:
- Computers do not lose unsaved work
- CPAP machines do not alarm or reset
- WiFi routers never reboot — your internet stays up
- Smart home devices never reset their schedules
- Cooking appliances mid-cycle continue uninterrupted
No traditional ATS at any price achieves this.
Additional capabilities beyond any traditional option:
- Per-circuit real-time power monitoring in the app
- Intelligent load shedding when battery reaches user-set threshold
- Time-of-use scheduling — run the dryer during off-peak electricity rates automatically
- Full solar input management alongside grid and battery
- Predictive battery modelling based on consumption history and weather forecast
Complete cost breakdown:
| Component | Typical Cost |
|---|---|
| EcoFlow Delta Pro (required) | ~$2,799 |
| EcoFlow Smart Home Panel II | ~$499 |
| Electrician labour (2–4 hours) | $200–$400 |
| Building permit | $50–$150 |
| Total installed | $3,548–$3,848 |
🛒 EcoFlow Smart Home Panel II →
🛒 EcoFlow Delta Pro (required base unit) →
See the complete Delta Pro Ultra + Smart Home Panel deep-dive: https://portablepowerlab.com/ecoflow-delta-pro-ultra-review/
The Complete Comparison Matrix
| Factor | Interlock Kit | Manual Switch | Auto Switch | Smart Panel II |
|---|---|---|---|---|
| Installed cost | $315–$830 | $660–$1,940 | $1,125–$3,900 | $3,548–$3,848 |
| Switchover speed | Manual (minutes) | Manual (minutes) | 2–30 seconds | 30 milliseconds |
| Automatic failover | No | No | Yes | Yes |
| Works while you sleep | No | No | Yes | Yes |
| App monitoring | No | No | No | Yes — per circuit |
| Load management | No | No | Basic | Full AI-managed |
| Solar integration | No | No | No | Full |
| Works with any station | Yes | Yes | Yes | EcoFlow only |
| Permit required | Yes | Yes | Yes | Yes |
| Electrician required | Yes | Yes | Yes | Yes |
Step-by-Step — The Interlock Kit Installation (Most Common Scenario)
The interlock kit is the most common transfer switch installation for portable power station owners. Here is the complete process — what the electrician does, what you can prepare, and how to verify the work was done correctly.
Before the Electrician Arrives — DIY Preparation Tasks
These tasks do not involve working inside the electrical panel and are appropriate for homeowners.
Task 1 — Identify Your Panel Brand and Model
Every interlock kit is panel-specific. An interlock for a Square D QO panel will not fit a Siemens panel. Identify your panel before ordering anything.
How to find your panel information:
- Open the outer panel door (not the inner cover — do not remove the inner cover)
- Brand is usually embossed on the door or on a label inside
- Series is printed on the panel door or on individual breakers
- Common brands: Square D (QO or Homeline), Siemens, Eaton/Cutler-Hammer, Murray, Leviton, GE
Take a clear photo of the panel door interior with all labels visible and send it to your electrician before the appointment.
Task 2 — Select and Purchase the Generator Inlet Box
The inlet box mounts on your exterior wall nearest the main panel. Match the inlet rating to your power station’s output:
| Power Station Output | Inlet Type | Inlet Rating |
|---|---|---|
| Up to 1,800W (most EcoFlow/Jackery 1000Wh) | NEMA L14-20 or L14-30 | 20A or 30A |
| 1,800–3,600W (Delta 2, Jackery 1000 Plus, AC200L) | NEMA L14-30 | 30A |
| 3,600–7,200W (Delta Pro, Jackery 2000 Plus) | NEMA L14-30 | 30A |
| 7,200W+ (Delta Pro Ultra) | NEMA L14-50 | 50A |
🛒 NEMA L14-30 Inlet Box (30A, weatherproof, for most installations) →
🛒 NEMA L14-50 Inlet Box (50A, for Delta Pro Ultra) →
Task 3 — Purchase the Generator Power Cord
This cord connects your power station’s AC output to the exterior inlet. Your power station outputs through standard NEMA 5-15R (standard 120V household) or NEMA 5-20R outlets. An adapter cord converts these to L14-30 for the inlet.
🛒 Generator Cord — L14-30 to 4x NEMA 5-20 Outlets (25ft) →
Task 4 — Map Your Critical Circuits
Walk your home before the electrician arrives and create a list of every circuit you want protected. For each, note:
- What is connected
- Breaker amperage (visible on the breaker)
- Estimated watts
The Lab’s recommended priority list:
| Circuit | Breaker | Voltage | Priority | Avg Watts | Safe on 120V-Only Station? |
|---|---|---|---|---|---|
| Refrigerator | 20A | 120V | Critical | 55–80W | ✅ Yes |
| CPAP / medical outlet | 15A | 120V | Critical | 30–300W | ✅ Yes |
| Master bedroom outlets | 15A | 120V | Critical | 50–200W | ✅ Yes |
| Router / modem | 15A | 120V | Critical | 15–25W | ✅ Yes |
| Sump pump (120V models) | 15–20A | 120V | High | 400–800W | ✅ Yes |
| Sump pump (240V models, larger HP) | 20–30A | 240V | High | 750–1,500W | ❌ No — 240V-native station required |
| Kitchen essential outlets | 20A | 120V | High | Varies | ✅ Yes |
| Select lighting circuits | 15A | 120V | High | 50–100W | ✅ Yes |
| Furnace fan (gas furnace, 120V blower) | 15A | 120V | High (winter) | 200–800W | ✅ Yes |
| Central air conditioning | 30–50A | 240V | — | 2,000–4,000W | ❌ No — 240V-native station required |
| Electric dryer | 30A | 240V | — | 4,000–6,000W | ❌ No — 240V-native station required |
| Well pump (deep well, 240V) | 20–30A | 240V | — | 750–1,000W | ❌ No — 240V-native station required |
Keep the total wattage of selected circuits within your power station’s continuous output rating — with 20% safety margin.
See complete wattage data: https://portablepowerlab.com/appliance-wattage-chart/
What the Electrician Does — Inside the Panel
This section documents the licensed work. Do not attempt it without a valid electrical licence.
Step 1 — Pull the Permit
The electrician files for a building permit with your local jurisdiction. Most municipalities require this before any panel work begins. Budget $50–$150 for the permit fee and 1–5 business days for approval.
Step 2 — De-Energise the Panel (Utility Coordination)
For work involving the main breaker and bus bars, the utility company can de-energise the meter upon request. This eliminates the live bus bars that remain energised even with the main breaker off — the primary hazard in panel work. A reputable electrician coordinates this step.
Step 3 — Install the Dedicated Generator Breaker
A new double-pole breaker (typically 30A) is installed in the specific panel position the interlock kit requires. The position varies by panel brand and interlock model — the electrician verifies the correct slot before installation.
Step 4 — Run Conduit and Wire to Exterior Inlet
10/3 wire (10 AWG with three conductors plus ground) runs from the new generator breaker through conduit to the exterior inlet box location. This wire handles 30A at 240V safely. Conduit is required by most jurisdictions for any exterior-exposed wiring.
The inlet box is mounted on the exterior wall, weatherproofed, and wired to the conductors from inside.
Step 5 — Mount and Verify the Interlock Kit
The interlock kit bolts to specific points on the main panel face using the mounting pattern designed for your panel model. Once installed, the electrician physically tests it in both positions:
- Generator breaker ON / Main breaker physically cannot close: confirmed
- Main breaker ON / Generator breaker physically cannot close: confirmed
This mechanical verification is the core safety function of the interlock.
Step 6 — Label, Test, and Schedule Inspection
Every component is labelled: the generator breaker (rating, inlet voltage), the inlet box (amperage, voltage), and any circuit breakers that will be selectively powered during generator operation.
The electrician performs a full functional test with a test load connected to the inlet, verifying power delivery to designated circuits and correct interlock operation. The local inspector then visits to verify NEC compliance and sign off the permit.
The Correct Operating Sequence During an Outage
Using an interlock kit during a power outage:
- Confirm the outage has lasted more than 30 seconds (avoids nuisance operation on momentary blinks)
- Walk to the main panel
- Turn OFF all individual circuit breakers (prevents overloading the power station at connection)
- Turn OFF the main breaker
- Slide the interlock to the GENERATOR position
- Connect power station to exterior inlet box via generator cord
- Power on the power station and confirm AC output
- Turn ON the generator breaker in the panel
- Selectively turn ON individual circuit breakers — adding one at a time, watching the power station’s wattage display to stay within its output rating
⚠️ CRITICAL WARNING — 240V Motor Loads and 120V-Only Power Stations
If your power station outputs 120V only (see the compatibility table above — this includes the EcoFlow Delta 2, Jackery Explorer 1000 Plus and 2000 Plus, Bluetti AC200L, and EcoFlow Delta Pro), never turn on any 240V breaker during generator operation. This includes:
- Central air conditioning compressor circuits
- Electric clothes dryer circuits
- Deep-well submersible pump circuits (240V models — common for wells over 100 feet deep)
- Electric range or oven circuits
- Electric water heater circuits
- Any double-pole breaker rated 30A or higher feeding a dedicated 240V appliance
Why this matters beyond “it just won’t work”: With a bridged 120V source feeding both legs of your panel, a 240V motor load that switches on will attempt to draw current in a configuration the power station was never designed to deliver. Motor-driven 240V loads (pumps, compressors) are especially risky in this scenario because their startup surge draws heavily and unpredictably from an incorrectly configured circuit — this can trip your power station’s internal protection, and in some cases stress the inverter beyond its design tolerance.
The safe practice: Before your first outage, walk your panel with your electrician and place a physical warning label on every 240V breaker that should stay off during generator operation. During the actual outage sequence (Step 9 above), only energise breakers you have confirmed are 120V circuits.
The exception: If you own the EcoFlow Delta Pro Ultra or Anker Solix F3800 with native 240V output connected directly (no bridging adapter), your 240V circuits — including central AC and well pumps — can be safely energised, provided the load falls within your unit’s rated continuous output and surge capacity. Confirm your specific appliance’s wattage against your station’s rating using our appliance wattage chart before energising any 240V circuit.
See complete 240V appliance wattage data: https://portablepowerlab.com/appliance-wattage-chart/
Returning to utility power:
- Turn OFF all individual circuit breakers
- Turn OFF the generator breaker
- Disconnect power station from inlet box
- Slide interlock back to UTILITY position
- Turn ON main breaker
- Restore circuit breakers selectively
Sizing the Transfer Switch to Your Specific Power Station
Every component in the transfer switch chain must be sized to handle your power station’s maximum output. Under-sized components are a fire hazard; over-sized components waste money.
The Sizing Formula
Inlet and breaker amperage = Power station max output (watts) ÷ 240V
| Power Station | Max AC Output | Inlet Size | Breaker Size |
|---|---|---|---|
| EcoFlow River 2 | 300W | L14-30 (headroom) | 30A |
| EcoFlow River 2 Pro | 800W | L14-30 | 30A |
| EcoFlow Delta 2 | 1,800W | L14-30 | 30A |
| Jackery Explorer 1000 Plus | 2,000W | L14-30 | 30A |
| Bluetti AC200L | 2,400W | L14-30 | 30A |
| Jackery Explorer 2000 Plus | 3,000W | L14-30 | 30A |
| EcoFlow Delta Pro | 3,600W | L14-30 | 30A |
| Anker Solix F3800 | 3,800W | L14-50 recommended | 40–50A |
| EcoFlow Delta Pro Ultra | 7,200W | L14-50 | 50A |
The 30A L14-30 inlet handles every mainstream portable power station up to the Delta Pro — making it the standard for nearly all residential installations. A single 30A inlet box and interlock kit installation serves you regardless of which power station you own now or purchase in the future (up to the Delta Pro tier).
Connecting a 120V-Only Power Station to an L14-30 Inlet
This section resolves a specific point of confusion that affects the majority of readers on this site, because most of our top-recommended power stations — the EcoFlow Delta 2, Jackery Explorer 1000 Plus, and Bluetti AC200L among them — output 120V only. They do not produce native 240V output the way the EcoFlow Delta Pro Ultra or Anker Solix F3800 does.
The problem this creates: A standard NEMA L14-30 inlet and interlock breaker are wired for 240V — they expect two separate 120V “hot legs” (commonly labelled Line 1 and Line 2), each carrying power on its own half of the panel’s bus bars. A 120V-only power station has just one 120V output. Plugged in incorrectly, only half of the circuits routed through the interlock system — the half wired to whichever leg received power — will actually work. The other half stays dead, and this confuses almost every first-time installer.
The correct solution — a generator bridging adapter:
A 120V-to-L14-30 bridging adapter (sometimes called a “120V generator adapter cord” or “hot-leg bridging cord”) takes the single 120V output from your power station and splits it, feeding the same 120V power to both Line 1 and Line 2 of the L14-30 inlet. This means every circuit routed through your interlock or transfer switch receives power, regardless of which leg it happens to be wired to.
What this bridging configuration does and does not do:
✅ Does: Power every 120V circuit in your protected circuit list — refrigerator, lighting, router, CPAP, most household outlets — because standard 120V circuits only draw from a single leg.
❌ Does not: Power any 240V appliance on the system, because true 240V requires the two legs to carry power at opposite phase — bridging both legs with the same 120V source does not create 240V. Any 240V breaker (central AC, electric dryer, well pump, electric range) must remain OFF when using a bridged 120V power station. Attempting to draw from a 240V circuit with a bridged 120V source will not deliver correct power and can potentially stress your power station’s inverter.
The critical labelling step: If you are using a 120V-only power station with a bridged L14-30 inlet, ask your electrician to clearly label every 240V breaker in your panel with a warning tag: “DO NOT ENERGISE ON GENERATOR POWER — 120V SOURCE ONLY.” This prevents you or another household member from accidentally switching on a 240V circuit during an outage.
🛒 120V to L14-30 Generator Bridging Adapter Cord →
Which of our recommended stations need this bridging adapter:
| Power Station | Native Output | Bridging Adapter Needed? |
|---|---|---|
| EcoFlow River 2 / River 2 Pro | 120V only | ✅ Yes |
| EcoFlow Delta 2 | 120V only | ✅ Yes |
| Jackery Explorer 1000 Plus | 120V only | ✅ Yes |
| Jackery Explorer 2000 Plus | 120V only | ✅ Yes |
| Bluetti AC200L | 120V only | ✅ Yes |
| EcoFlow Delta Pro | 120V only | ✅ Yes |
| Anker Solix F3800 | Native 120V/240V | ❌ No — connects directly |
| EcoFlow Delta Pro Ultra | Native 120V/240V | ❌ No — connects directly |
Note that this table reflects the same distinction covered in our EcoFlow Delta Pro Ultra review: the “240V threshold” that separates whole-home-capable units from standard 120V backup stations applies directly to transfer switch wiring, not just appliance compatibility.
See the full 240V capability breakdown: https://portablepowerlab.com/ecoflow-delta-pro-ultra-review/
Wire Gauge for Safe Power Delivery
The conduit run from panel to exterior inlet must use appropriately gauged wire:
| Breaker / Inlet Rating | Minimum Wire Gauge | Notes |
|---|---|---|
| 20A | 12 AWG | Adequate for very small stations only |
| 30A | 10 AWG | Standard for most installations |
| 50A | 6 AWG | Required for Delta Pro Ultra |
Under-gauged wire is the most common DIY electrical mistake. Wire that is too thin for the breaker rating overheats under load — the primary cause of electrical fires from improperly installed generator connections. Your electrician will select the correct gauge; verify it matches the table above.
Ground-Neutral Bonding — How to Avoid Tripping Panel GFCIs
This is the single most common technical frustration reported by portable power station owners after transfer switch installation, and almost no consumer guide explains it. If your critical circuits keep tripping after switching to generator power — even though your power station is running fine — this section is almost certainly the cause.
What Bonded and Floating Neutral Actually Mean
Every AC electrical system needs the neutral conductor bonded to ground at exactly one point. In a normal home, that single bonding point is inside your main panel, at the main breaker. This is a National Electrical Code safety requirement — it gives fault current a defined path back to the source, which is what allows a GFCI or AFCI breaker to detect a fault and trip.
Floating neutral (most portable power stations): Inside the power station, the neutral output and ground are electrically separate — not bonded to each other. This is the standard configuration for the vast majority of consumer power stations, including the EcoFlow Delta 2, Delta Pro, Delta Pro Ultra, the full Jackery Explorer Plus lineup, Bluetti AC-series, and Anker Solix units. These stations rely on your home’s existing bond at the main panel.
Bonded neutral (some standalone generators, a minority of power stations): Inside the unit, neutral and ground are bonded together — the same design used in most portable gasoline generators intended for standalone use away from a structure.
Why This Causes GFCI Nuisance Tripping
With a floating-neutral power station connected through a standard interlock kit: This is the normal, correct configuration. Your power station relies on the single ground-neutral bond that already exists inside your main panel. Fault protection works correctly. This is why interlock kits are compatible with virtually every mainstream power station without modification.
With a bonded-neutral power station connected the same way: You now have two ground-neutral bonds in the system simultaneously — one inside the power station, one inside your main panel. This creates a parallel path for neutral current to flow through the ground conductor. GFCI breakers, which are designed to detect any current imbalance between hot and neutral, sense this parallel path as a fault and trip — even though nothing is actually wrong. This is the nuisance tripping many DIY generator installers report.
How to Check Your Power Station’s Neutral Configuration
Check your power station’s manual or specification sheet for the phrase “floating neutral” or “bonded neutral.” If it is not explicitly stated:
| Brand / Model | Neutral Configuration | Source |
|---|---|---|
| EcoFlow Delta 2 / Delta Pro / Delta Pro Ultra | Floating | EcoFlow technical documentation |
| Jackery Explorer Plus series (all models) | Floating | Jackery technical documentation |
| Bluetti AC-series (AC180, AC200L, AC300) | Floating | Bluetti technical documentation |
| Anker Solix (C1000, F3800) | Floating | Anker technical documentation |
The practical takeaway for readers of this guide: Every power station recommended throughout this site uses a floating neutral. If you are using one of these units with a standard interlock kit or manual transfer switch installed correctly by a licensed electrician, this is not a concern — your system relies on the single bond in your main panel exactly as designed, and GFCI protection functions correctly.
Where this becomes relevant: If you already own or are considering a standalone gas generator with a bonded neutral as a backup to your power station, do not connect both to the same transfer switch system without your electrician confirming compatibility. Mixing a bonded-neutral source and a floating-neutral source through the same interlock can create the double-bond problem described above.
The 3-Pole vs. 2-Pole Question
For most residential interlock kit and manual transfer switch installations using a floating-neutral power station, a standard 2-pole transfer (switching only the two hot legs, leaving neutral and ground permanently bonded at the main panel) is correct and code-compliant. A 3-pole switch (which also switches the neutral conductor) is only necessary in specific scenarios — most commonly when connecting a bonded-neutral generator, or in certain commercial/industrial configurations. Your electrician will specify the correct configuration for your exact power station and panel combination; this is one of the value-adds of using a licensed professional rather than following a generic online guide.
Permit Requirements — The Honest Landscape
Permit requirements for transfer switch installations vary by jurisdiction. Here is the practical reality:
Permits Are Required in Virtually All Urban and Suburban Jurisdictions
Any jurisdiction that has adopted the 2017 or later National Electrical Code requires a permit for this work. This includes all major metropolitan areas, California, Florida, Texas, New York, New Jersey, and the majority of suburban communities nationwide.
The Cost of Skipping the Permit
Home sale: Unpermitted electrical work must be disclosed when selling. Home inspectors find unpermitted panel modifications routinely. The seller typically must obtain a retroactive permit (expensive — requires exposing and re-inspecting all work) or reduce the sale price to reflect the liability.
Insurance claims: A fire claim in an area with unpermitted electrical work gives the insurer grounds for denial. “Unpermitted modification to the electrical panel” is a documented reason for denied homeowner’s claims. The potential claim denial on a $200,000 structure fire makes the $100 permit fee the most cost-effective insurance you can buy.
The permit cost ($50–$250) is the smallest line item in the project and provides the most long-term financial protection. There is no scenario in which skipping the permit is the correct financial decision.
The EcoFlow Smart Home Panel II — Why Battery Owners Should Consider It First
For owners of the EcoFlow Delta Pro or Delta Pro Ultra specifically, the Smart Home Panel II deserves consideration before any of the three traditional options — because it was engineered around how battery power stations actually work, not how gas generators work.
Traditional ATS was built around one core assumption: the power source needs 10–30 seconds to produce stable power after connection. Gas generators require warm-up. A battery power station does not. The Smart Home Panel II leverages zero spin-up time to achieve 30ms transfer — a fundamentally different protection category than anything a traditional ATS delivers.
The protection matrix:
| What Gets Protected | Traditional ATS (2–30 sec) | Smart Home Panel II (30ms) |
|---|---|---|
| Refrigerator | ✅ — tolerates brief interruption | ✅ |
| CPAP machine | ⚠️ — may alarm and reset | ✅ Never interrupted |
| Desktop computer | ⚠️ — loses unsaved work | ✅ Never interrupted |
| WiFi router | ⚠️ — reboots (60–90 sec) | ✅ Never reboots |
| Smart home devices | ⚠️ — may reset schedules | ✅ |
| Medical infusion pump | ❌ — interruption unacceptable | ✅ Never interrupted |
For households where any device in the second or third row is a concern, the Smart Home Panel II is not the premium option — it is the correct option.
Full Smart Home Panel II analysis: https://portablepowerlab.com/ecoflow-delta-pro-ultra-review/
🛒 EcoFlow Smart Home Panel II →
10-Year Total Cost of Ownership — All Four Options
| Option | Install Cost | Annual Maintenance | 10-Year Total | Best Suited For |
|---|---|---|---|---|
| Interlock Kit | $315–$830 | $0 | $315–$830 | Manual outage management, budget-first buyers |
| Manual Transfer Switch | $660–$1,940 | $0 | $660–$1,940 | Selective circuits, cleaner operation |
| Automatic Transfer Switch | $1,125–$3,900 | ~$50/yr | $1,625–$4,400 | Unattended failover, non-EcoFlow stations |
| EcoFlow Smart Panel II | $3,548–$3,848 | $0 | $3,548–$3,848 | EcoFlow owners, medical devices, home offices |
The Smart Home Panel II at $3,548–$3,848 installed compares directly with a traditional ATS at $1,625–$4,400 — while delivering 30ms transfer, app intelligence, solar integration, and load management that no traditional ATS offers at any price.
The Complete Shopping List — Everything You Need
Interlock Kit Installation (Most Homeowners)
| Item | Purpose | Link |
|---|---|---|
| Panel-specific interlock kit | Core mechanical safety device | Square D → |
| NEMA L14-30 inlet box | Exterior power connection point | Amazon → |
| 30A generator power cord (25ft) | Connects power station to inlet | Amazon → |
| Weatherproof in-use cover | Protect inlet from rain when cord is connected | Amazon → |
| Non-contact voltage tester | Verify circuits are de-energised before inspection | Amazon → |
Manual Transfer Switch Addition
| Item | Purpose | Link |
|---|---|---|
| Reliance Controls 6-circuit MTS | Core sub-panel hardware | Amazon → |
| 10/3 Romex cable (25ft) | Wire runs between panel and MTS | Amazon → |
EcoFlow Smart Home Panel II System
| Item | Purpose | Link |
|---|---|---|
| EcoFlow Smart Home Panel II | Core system | Amazon → |
| EcoFlow Delta Pro | Required base power station | Amazon → |
| 200W Solar Panels (optional first phase) | Begin solar self-sufficiency immediately | Amazon → |
Frequently Asked Questions
Can I install a transfer switch myself?
For work inside the main electrical panel: no, in most US jurisdictions. Panel connections require a licensed electrician and permit. What you can do yourself: purchase components, mount the exterior inlet box (in many jurisdictions), run exterior conduit, and prepare circuit mapping documentation. Confirm local requirements with your building department before any work.
What size interlock kit do I need?
The interlock kit must match your exact panel brand and model — not just the brand family. A Square D QO and a Square D Homeline use different interlock kits. Take a clear photo of your panel interior and confirm the exact model with your electrician or the interlock kit manufacturer before ordering.
How long does transfer switch installation take?
Interlock kit: typically 2–4 electrician hours. Manual transfer switch: 4–8 hours. Automatic transfer switch: 6–12 hours. EcoFlow Smart Home Panel II: 2–4 hours for panel work after the system is delivered. Add 1–5 business days for permit approval in most jurisdictions.
Does a transfer switch work with any power station?
Options 1, 2, and 3 work with any power station that has standard AC output — the connection is made through the generator inlet box regardless of brand. The EcoFlow Smart Home Panel II works only with EcoFlow Delta Pro and Delta Pro Ultra. Interlock kits and manual transfer switches are the universal options.
What is the real cost of using extension cords instead of a transfer switch?
Extension cords connecting your power station directly to appliances require no permit and are legally compliant. The practical costs: you must manually relocate appliances during every outage, trip hazards exist across doorways, hardwired appliances (built-in refrigerators, sump pumps, well pumps, HVAC) cannot be reached by extension cord, and undersized cords carrying refrigerator or sump pump loads create genuine fire hazards. A transfer switch is the correct permanent solution for full home integration.
Why do half my circuits stay dead when I connect my power station to the interlock system?
This almost always means you are using a 120V-only power station (such as the EcoFlow Delta 2 or Jackery Explorer 1000 Plus) connected directly to an L14-30 inlet without a bridging adapter. The L14-30 inlet expects two separate 120V legs; a single-output 120V station only energises one of them without bridging. Add a 120V-to-L14-30 bridging adapter cord to feed both legs and restore power to every 120V circuit. See the bridging section above for the complete explanation and product link.
Why does my GFCI breaker keep tripping when running on my power station?
This is most commonly a ground-neutral bonding conflict. If you are using a bonded-neutral generator alongside your transfer switch system, it may be creating a duplicate ground-neutral bond alongside the one already present in your main panel, which GFCI breakers interpret as a fault. Every mainstream portable power station recommended on this site (EcoFlow, Jackery, Bluetti, Anker) uses a floating neutral and does not cause this issue when installed correctly by a licensed electrician. If nuisance tripping occurs, have your electrician verify your specific unit’s neutral configuration and panel bonding.
Can I turn on my central air conditioner breaker during an outage if I have a 120V power station?
No — not safely, and it will not work correctly. Central air conditioning is a 240V circuit. A 120V-only power station bridged to feed both panel legs cannot deliver true 240V power. Leave all 240V breakers off unless you own a power station with native 240V output, such as the EcoFlow Delta Pro Ultra or Anker Solix F3800, connected without a bridging adapter
🛒 Browse Generator Interlock Kits on Amazon →
🛒 Browse Manual Transfer Switches on Amazon →
🛒 Browse Automatic Transfer Switches on Amazon →
Portable Power Lab — Real Math. No Fluff. Independent since 2025.